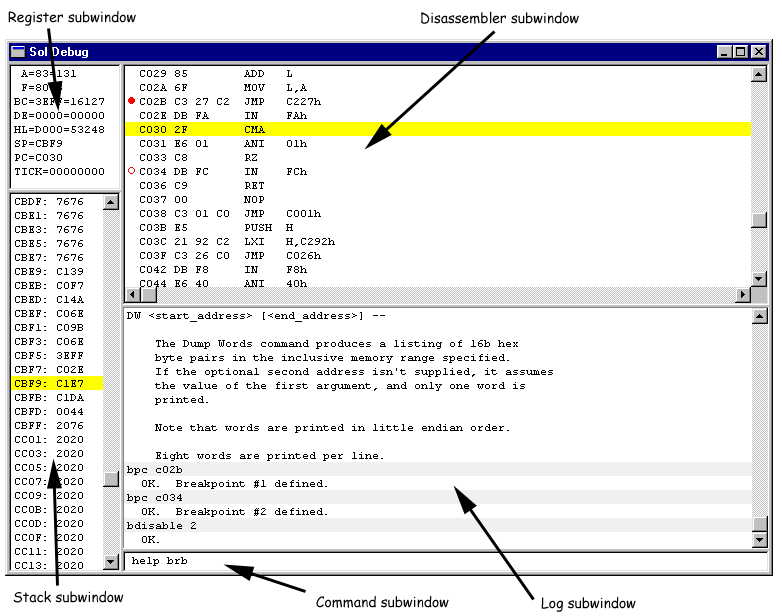
While Solace is running, if the user hits <F5> (function key 5),
the following debugger window will pop up. In the diagram below,
each of the subwindows of the debugger is labeled, and will be described
in more detail in subsequent sections. The five subwindows are
The scrollbars that appear in three of the subwindows behave like normal
Win32 scrollbars, except as noted. The thumb of a scrollbar can be
dragged to reposition the window contents; clicking on the up/down arrows
of a scrollbar scrolls the window by one line; clicking above or below
the scrollbar thumb causes the window contents to scroll up or down by
a screenful. If a given subwindow has input focus, achieved
performing some mouse command (such as clicking) in the window, the keyboard
interface to the scrollbar also works. That is, the up/down arrows
scroll the window by one line; the page up/page down keys scroll the subwindow
by one page.
Note that although the entire window can be resized, the only window
divider than can be moved is the one between the disassembler subwindow
and the log subwindow.
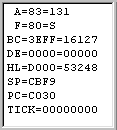
Register subwindow
The register subwindow shows the current state of all the
8080 registers any time the emulation is halted. It is automatically
updated after each single step or other state change. This subwindow
is grayed out while the emulator is running the 8080 processor.
The value for each register is given in two forms. The first form
lists the register contents in hex (either 8b or 16b), the second form
after the second '=' is the value in decimal. The flags register
is somewhat different, in that the second form shows which flags are set
mnemonically: S=sign, Z=zero, H=half carry, C=carry, P=parity.
Tick is the current emulated 8080 cycle count; it currently is not working.
This window is read-only. To modify the contents of a register,
use the SET command via the command subwindow.
Stack subwindow
The stack subwindow shows the region of memory surrounding
the stack pointer, SP. The display shows 16-bit words, all even/odd
aligned with the current SP value. The entry that corresponds to
the top of stack (TOS) is shows highlighted in yellow. This subwindow
is grayed out while the emulator is running the 8080 processor.
The region of memory being viewed can be manipulated in the usual ways
via the scrollbar, or if the window has input focus, by the standard keyboard
interface. As an extension of normal behavior, the HOME key can be
used to scroll the window such that the TOS is visible.
Although this window automatically centers the display on the current
TOS when the debugger is invoked, the window can be scrolled to any location
in the 64K memory space. To make the scrolling fast, when the thumb
is dragged, the window isn't updated; instead a small 4-digit hex number
is shown, and the display is updated when the thumb is released.
The window is read-only. To modify the contents of the stack,
or more generally any memory location, use the ENTER, EB,
or EA commands via the command subwindow.
Disassembly subwindow
The disassembly subwindow is used to display the program in
memory using standard Intel 8080 mnemonics. If the instruction corresponding
to the current PC is in the window, it is displayed with yellow highlighting,
as shown above. This subwindow is grayed out while the emulator is
running the 8080 processor.
Using standard windows scrollbar behavior, the user can change the region
being displayed in the window. As an extension of normal windows
scrollbar behavior, if the window has input focus, hitting the HOME key
causes the display to scroll such that the line containing the current
PC is positioned in the window.
Because updating the display is slow, dragging the thumb on the vertical
scrollbar doesn't immediately scroll the display. Instead, a four-digit
hex display is shown of which area of memory will be displayed when the
thumb is released.
Note that scrolling backwards or jumping to an arbitrary starting location
is problematic. This is because 8080 instructions can be one, two,
or three bytes long. For example, when scrolling back one line, going
back one byte might be a valid one byte opcode, or it might be the immediate
data of a two-byte or three-byte instruction. Solace uses a heuristic
to try and get a reliable "sync"; it goes back 10 instructions or so and
disassembles forward. If the address of interest falls in the middle
of an instruction in the resulting stream, it is assumed that the immediately
preceding instruction start is the true instruction boundary. Although
it works is most cases, the heuristic isn't foolproof, so be warned that
this may happen if the disassembly seems goofy.
Note that two of the instructions have a red circle in the left column.
A solid red circle (at $C02B, above) means that there is an active breakpoint
on that instruction. A hollow red circle (at $C034, above) means
that there is a disabled breakpoint on that instruction.
Breakpoints can be entered, listed, and manipulated via the command
line interface, but this window provides a few shortcuts as well.
Holding down the CTRL key and left-clicking on a line causes a breakpoint
to be set on that line. If there is already an active breakpoint
on the line, it is disabled; if there is already a disabled breakpoint
on that line, the breakpoint is killed (deleted).
Double left clicking on a line causes a temporary breakpoint to be set
on the line and 8080 execution is resumed until the line is reached or
another breakpoint is encountered, whichever comes first.
Right clicking on a line causes a pop-up menu to appear with a few choices;
some choices will be grayed-out based on context:
Add breakpoint
Disable breakpoint
Enable breakpoint
Kill breakpoint
Run to PC
Home current PC
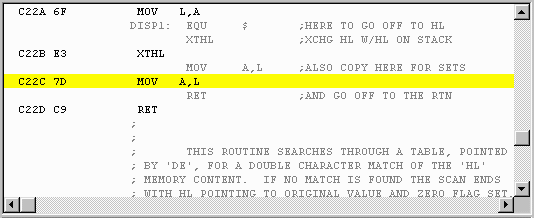
The integrated Solace 8080 debugger supports source code overlays.
These are simply the .PRN files that are output by the standard CP/M ASM
and MAC assemblers. Whenever a .ENT or .HEX file is loaded from the
main menu, Solace looks in the same directory for a file with the same
root name but with a .PRN suffix. If it is found, it is "autoloaded"
as a source code overlay. Optionally, a user can manually load a
source code overlay via the debugger command line interface via the "OVerlay"
command. In either case, the OVerlay command has many forms which
can be used to control how overlay information is managed and used.
Below appears three snippits of the disassembler window with different
overlay modes enabled. In the "on" mode, whenever Solace needs to
disassemble at a given instruction, it checks to see if there is a source
code overlay matching that address. If there is a match, then the
source code file is displayed. If there is no match, the line is
just mechanically disassembled. In the "off" mode, it is as if there
is no overlay in memory. In the "both" mode, if there is a source
code overlay for a given address, it is displayed (but in gray) and the
line is also mechanically disassembled.
In either "on" or "both" modes, the bytes of memory corresponding to
the source line are compared against the actual memory contents.
If they don't match, the source line is still printed, but it appears as
red text instead of black.
More than one overlay can be in memory at one time. If one address
has a match in more than one overlay, the most recently loaded or refreshed
overlay is the one shown. In the cause of autoloaded overlays (i.e.,
those loaded implictly as the result of loading a .hex or .ent file from
the main menu), the overlay system can elect to dispose of an overlay if
too little of the overlay is meaningful. Manually loaded overlays
stay in memory until explicitly purged.
The overlay command takes many form so it is best to type "help overlay"
in the debugger to get the rundown.
Log subwindow
The log subwindow shows a history of commands that the user
has typed in and the debugger responses. The user input is echoed
with a grayed background to help distinguish commands from responses.
500 lines of history are maintained; lines older than that simply vanish.
There is currently no way to log the output to a file, nor to copy a selection
from the window.
The vertical scroll bar appears whenever there are enough lines in the
command history to warrant it. The scrollbar responds to the typical
scrollbar behavior: the window may be scrolled up/down a line/page at a
time by clicking on the up/down arrows are above/below the thumb; the thumb
can be dragged. If the log subwindow has input focus, which is achieved
by clicking in the window or by manipulating the scrollbar, then the scrollbar
responds to standard keyboard scrolling behavior. The up/down arrow
keys move the display up/down one line; the up/down page keys scroll the
display a page at a time. Typing the HOME key causes the window to
scroll such that the last entry becomes visible.
Command subwindow
The command subwindow accepts debugger commands from the user;
a command is interpreted when the ENTER key (carriage return) is hit.
50 lines of command history are maintained; commands older than this
are simply discarded. The user can access older commands via the
up/down arrows; up-arrow corresponds to moving to older commands.
To prevent tediously scrolling past commands which have been repeated,
the command history mechanism will show a given command only once when
scrolling up or down through the command history.
Note that some of the mouse command shortcuts in the disassembler subwindow
"stuff" phantom commands into the command subwindow to cause the specified
actions to happen.
A brief rundown of the debugger commands can be had at any time in the
debugger by typing
help
without any arguments. Here is a key to interpreting the following
table of commands:
<foo> means that foo
isn't literal, just descriptive of what the argument is.
Things in square brackets, like [foo],
means it is an optional argument.
Ellipses (...) means that there can be a number
of subsequent arguments.
Command names can be abbreviated in many cases; below the necessary part is
shown in caps, while the optional part is in lower case and inside parentheses.
Numeric arguments are hex by default, but this can be overridden to be
decimal by starting the number with a "#" character.
The command line is case insensitive except for the string arguments to
the EA and LA commands.
Here, then, is the list of commands:
    memory commands:
	DB    <start> [<end>]          dump bytes
	DW    <start> [<end>]          dump words
	DA    <start> [<end>]          dump ascii
	EB    <start> aa bb ...        enter bytes (also EN(ter))
	EA    <start> abcde...         enter ascii
	FILL  <start> <end> <bb>       fill block
	LB    <start> <end> aa bb ...  locate bytes
	LA    <start> <end> abcde...   locate ascii
	MM    <start> <end> <dest>     move memory
	CM    <start> <end> <dest>     compare memory
	SM    <start> <end> aa bb ...  show matching bytes
	DASM  <start> [<end>]          disassemble
	LOAD  <fname>                  load .ent or .hex binary file
	SAVE  <start> <end> <fname>    save binary to .ent file
	SAVEH <start> <end> <fname>    save binary to .hex file

    execution commands:
	RESET                        reset uP
	N(ext)    [<nnnn>]           step over n ops
	S(tep)    [<nnnn>]           step in n ops
	EX(ecute) [<nnnn>]           continue execution
	C(ont)    [<nnnn>]           synonym for EX
	SET <reg> <nnnn>             modify register
	INC(lude) <filename>         perform a file of commands

    breakpoint commands:
	TO    aaaa                   run to PC=aaaa
	BP(c) aaaa                   break  PC=aaaa
	BR(b) aaaa [dd [mm]]         break read  byte addr=aaaa, data=dd,   mask=mm
	BRW   aaaa [dddd [mmmm]]     break read  word addr=aaaa, data=dddd, mask=mmmm
	BW(b) aaaa [dd [mm]]         break write byte addr=aaaa, data=dd,   mask=mm
	BWW   aaaa [dddd [mmmm]]     break write word addr=aaaa, data=dddd, mask=mmmm
	BI(n)   aa [dd [mm]]         break in  port=aa, data=dd, mask=mm
	BO(ut)  aa [dd [mm]]         break out port=aa, data=dd, mask=mm
	BL(ist)    [<nn>]            breakpoint list    all/nn
	BD(isable) [<nn>]            breakpoint disable all/nn
	BE(nable)  [<nn>]            breakpoint enable  all/nn
	BK(ill)    [<nn>]            breakpoint remove  all/nn

    misc commands:
	OV(erlay) [<file[.prn]>|<id>] [OFF|ON|BOTH|REFRESH|KILL] source code overlay
	KEY <nn>                     force a keystroke
	H(elp) [<cmd>]               command summary
	EXIT | X(it)                 close debugger
There is a detailed command description for each debugger command,
accessed by typing
help <command>
Brief note on breakpoints
There are two types of breakpoints: PC breakpoints, and data breakpoints
(read byte, read word, write byte, write word, in, and out). It should
be noted that PC breakpoints are triggered before the instruction at the
specified address is executed, while data breakpoints occur after the instruction
that triggered the breakpoint is executed.