Keyboard Repair
Keyboard Operation (link)
The keyboard mechanism used in the Sol computer was manufactured by Keytronic corporation, which is still in business. The technology employed by the keyboard is interesting. Unlike a lot of keyboards, which used "ohmic" switches (basically, a piece of metal shorting together two other pieces of metal), which can stop working due to oxidation or bits of crud getting in the way of the electrons, the Sol keyboard used capacitive sensing.
In capacitive sensing, the circuit measures how much capacitance there is under each key plunger. The capacitor is formed by the copper traces on the PC board. Normally, the plunger on a key is up high, and there is a certain amount of capacitance formed by the gap between the two copper areas directly beneath the key. When the key is depressed, the plunger comes down. On the bottom of the plunger is a pieces of foam with a clear pieces of plastic on the side near the traces, and a piece of mylar on the side near the plunger. With this piece of mylar pressed close to the two copper pads, the capacitance increases, and the circuit can tell that the key is depressed.
You can read about detailed operation of the keyboard by studying the schematic for the keyboard and reading the theory of operation in chapter 8 of the Sol Systems manual.
In all the pictures below, click on an image to get a close up view of the action.
This page is mostly obsolete, as there appears to be no source of replacement pads. Geoff Harrison has figured out a way to make his own, and has a nice write-up on how he did it. Please see Geoff's web page on how to repair a Sol-20 Keyboard. This link is another approach for the Apple Lisa, which also used a Keytronic keyboard.
Update 2019/09/22: Good news! There is a source once again for replacement keypads. I have not used them, but others have reported they work. Texelec has a 105 key replacement pad set at a reasonable price.
Update 2020/07/03: Dave from osiweb.org has designed a complete replacement keyboard for the Sol-20 using modern Cherry keyswitches. The design is open source. There are two versions of the keyboard encoder: DIP only and surface mount.
Keyboard Failure (link)
What happens inevitably is that the foam under the keypad loses elasticity (even if the keyboard is never used) and the foam rubber can even crumble. The symptom is that some of the keys don't work when depressed, or work only sporadically. What happens is that when the key is pressed, the foam compresses and doesn't spring back.
An old pad before compression:
That same pad after compression. Notice it doesn't spring back!

Keyboard Workaround (link)
You can actually disassemble the keyboard by unscrewing the couple dozen little screws and remove the entire keyboard frame, leaving the bare PC board exposed. After hooking everything up again, touch the metal Sol case to discharge any static electricity you may be harboring. Type on the PC board with your bare fingers and you can actually activate the keyboard. Key bounce is a problem, though.

This is only a temporary work around to be done only when desperate.
Fixing the Keyboard (link)
I've fixed a couple keyboards, and this way works for me. No doubt, others have better techniques, so please share them with me.
The first step is to get replacement keypads. Don't scrimp and just replace the pads of the keys that appear to be failing: replace all of the keypads while you are at it. Until the middle of 2001, it was possible to get replacement keypads directly from Keytronic for $0.10 per pad. Add in $7 for shipping, and it cost about $16 to replace all the keypads. However, Keytronic doesn't sell them anymore.
There is another avenue for getting replacement pads. Someone tipped me off that Sun type 5 keyboards used the same keypads that the 25 year old Sol used. I bought two used Sun type 5 keyboards only to find out that they don't. However, I have found that Sun type 4 keyboards do have compatible pads. I bought one keyboard used for $5 at a local junk shop, and I've since bought two others on EBay for $6 each, plus shipping.
In the Sun keyboards I've taken apart, there are two different color pads: yellow, and gray. The gray ones appear to be a different density of foam, and are used under the keys that get the most use: shift, space bar, return, backspace, control, etc. I took pains to put those presumed "heavy-duty" pads under similar keys on the Sol. At first I found that those keys didn't function very well in the Sol keyboard, but after pounding them heavily dozens of times, they seem to be working OK now. Perhaps they would be best avoided. Here's a picture of the two types of pads to be found in Sun type 4 keyboards:

Once you have gotten hold of some pads one way or another, it is time to replace the ones in your Sol.
Disconnect the little ribbon cable from the motherboard that goes to the keyboard, and unscrew the four screws holding the keyboard to the case. Work someplace unlikely to have static -- like at a wood table on a wood floor, not sitting on your couch.
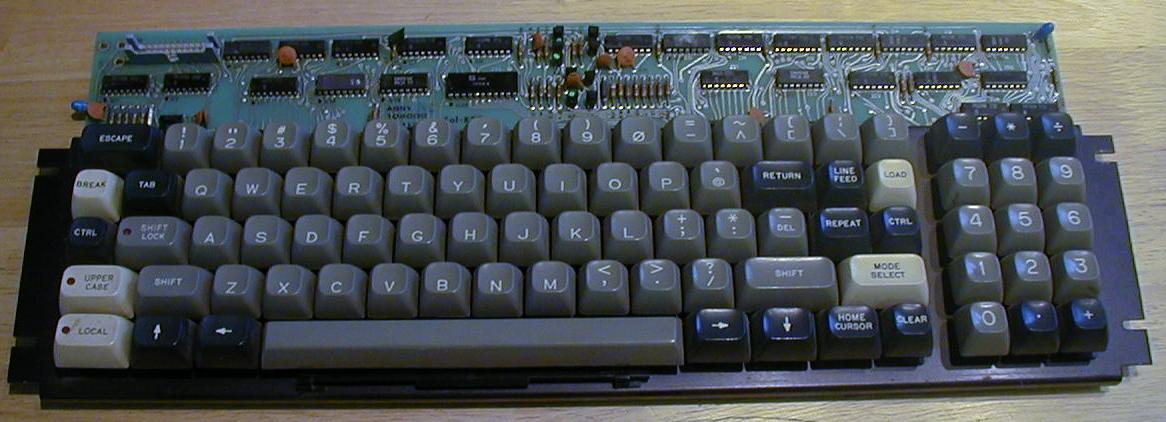
Here is the keyboard after it is removed from the Sol, before disassembly:
Flip the keyboard over and unscrew the couple dozen tiny screws:

When you have removed them all, the entire keyboard frame should just come off. I've heard others say that they pry off each keycap (watch out for the leaping springs!) and doing things somehow from the other side, but that seems like a lot of work (and you have to remember where each keycap goes when you are done).
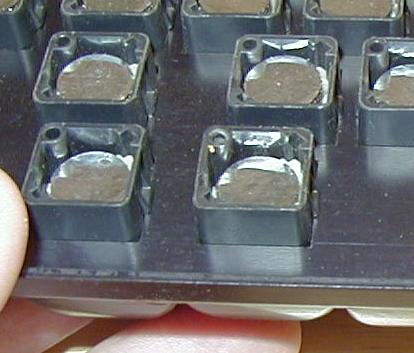
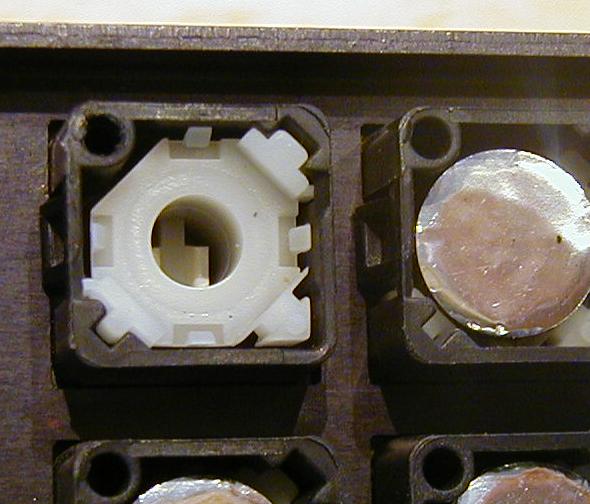
You should see a plastic disk under each key plunger. I depress each key so that the plunger is more exposed.
Before depressing the plunger:
After depressing the plunger:

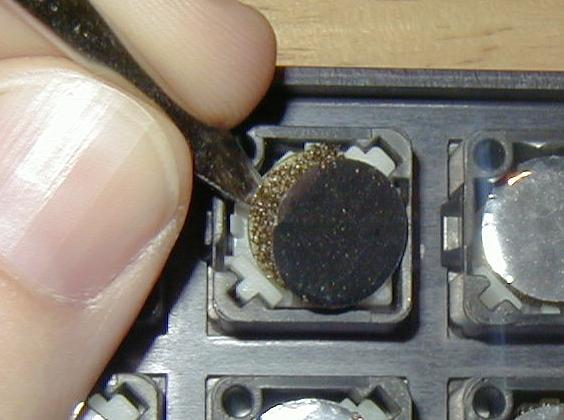
Each plastic disk is held in place in each of the four corners by a slit in a corner post. I take a small flathead screwdriver and pry underneath the buried plastic disk by one corner. The disk will flex and pop out. Since these pads are trash, you don't have to be too gentle about it. With practice it should only take about five seconds per key.
Prying off a pad:
Plunger sans pad:
When you've cleared them all out, it is probably a good time to shake out/vacuum/brush out any loose crumbly pad material that has just been liberated. Then start snapping in the replacement pads. Make sure the clear disc is near the plunger, and the mylar side (the silvered one) is going to be in contact with the PC board. Snapping the replacement pads back in is a little slower than taking them out, partly because you must be more careful. Just flex each disk and make sure that all four sides are being held; you should actually hear a click when it snaps into place. Use a small screwdriver or tweezers to push each of the sides and make sure they are held down by the "claws" of the plunger. The whole thing takes about half an hour.
The rest should be obvious: put the keyboard frame back on the PC board, screw in the couple dozen tiny screws, screw the keyboard to the case of the Sol with the four screws, then finally connect the keyboard ribbon cable back to the motherboard (J1 on the keyboard to J3 on the motherboard).