Poly Front Panel
As you can see in the images above, Poly systems didn't have much on their front panels other than an on/off switch and a Reset (or Load) button. No, when we Poly users say Front Panel, we're referring to a very useful piece of software.
|
The Poly Front Panel was a standard software feature in both the Poly‑88 and 8813 ROM code. It allowed the user to examine and modify memory and registers, and single-step through programs. It was called the Front Panel in reference to some earlier machines, such as the Altair (right) which had an actual set of lights and switches on their front panel. |

This is not a Poly. |
Entering the Front Panel
In the Poly-88, you could press Control-Z at any time to enter the Front Panel.
In the 8813, you needed to type the ENABLE command (EN for short). This would change the system prompt from $ to $$, which would allow you to use certain dangerous commands, like INIT to format a floppy, or Control-Z to enter the Front Panel. (Interestingly, Cisco routers use the same ENABLE command, for the same "dangerous commands" purpose.)
There were certain error conditions which would also cause the system to enter the Front Panel. If the Front Panel display appeared unexpectedly, it usually meant your system had crashed.
In the rest of this article we'll take a close look at the Front Panel's operation. If you like, you can fire up the emulator program and follow along with us.
Front Panel display
 In the top half of the Front Panel display, you would see: In the top half of the Front Panel display, you would see:
The CPU registers, listed down the left side, with their current values. In this example, the Program Counter (PC) is 0070, the Stack Pointer (SP) is 0FF8, and so on.
Next to each value, eight bytes of memory would be displayed, showing the memory contents pointed to by that register pair. Notice the up-arrow in the bottom center. This shows the exact byte pointed to by a register pair. In this example, the PC contains 0070, and the contents of address 0070 is C2. Memory address 0071 contains 6E, and so on. Three bytes before, and four bytes after, are shown.
The AF register pair can't point to memory, so it's an exception to this rule. In this example, A contains FF, and the F (flags) register contains 84. The M indicates that the Minus bit in the flags register is set.

In the bottom half of the display, we find a window into memory. The four-digit numbers on the left are memory addresses. To the right of each, is a set of eight bytes pointed to by that address. The right-pointing arrow indicates the current "window" location, where we can enter data.
In this example, the window address is 0000. Starting at that address in memory we find the bytes: 31 00 10 C3 and so on.
Front Panel commands
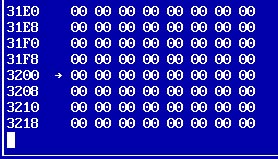 To set the memory window location, use the L (Look) command. For example, to look at 3200 hex, we would type: To set the memory window location, use the L (Look) command. For example, to look at 3200 hex, we would type:
L3200 space
(Use a space at the end of most commands.) The memory window has been moved to 3200, as you see to the right.
Now let's enter some data bytes, which coincidentally happen to make up a small program:
3E space 01 space C6 space 02 space
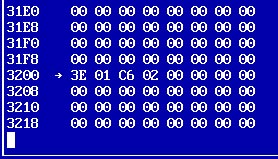 This makes up the program: This makes up the program:
MVI A,1 ;load the A register with 1
ADI 2 ;add 2 to the A register
Type L3200 space again. Your screen should now look like the one to the right.
Now we will prepare to run the program, by setting the Program Counter (PC) to the address where we loaded the program. To do this, we enter the SP (Set PC) command, followed by J (to indicate a Jumbo, 4-digit value follows) and the address 3200.
SPJ3200 space
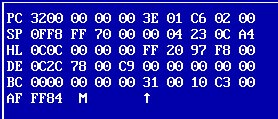 The top of your screen should show the PC pointing to 3200, as seen to the right. Notice the A register hasn't changed from FF (or whatever yours was previously). The top of your screen should show the PC pointing to 3200, as seen to the right. Notice the A register hasn't changed from FF (or whatever yours was previously).
If we had entered a complete program, we could press G to start executing it now. But since we only entered two instructions, we're instead going to single-step it a couple of times.
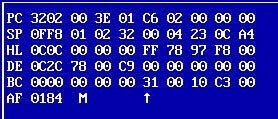 Press X to single-step (eXecute one instruction). Press X to single-step (eXecute one instruction).
Notice A has changed to 01, after the MVI A,1 instruction.
Also notice the PC has been advanced to 3202, since we executed one instruction which was two bytes long.
Now press X one more time, to execute the second (and last) instruction of our very brief program.
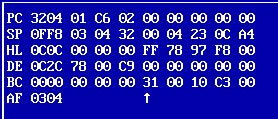 Notice A has changed to 03 after the ADI 2 instruction. Notice A has changed to 03 after the ADI 2 instruction.
The F register is now 04. Since the result is not zero or negative, there is no Z or M flag displayed.
You have just calculated that 1 + 2 = 3.
Congratulations! Most programs are just that simple. (Not.)
There are certainly more sophisticated Monitor programs available, including Poly's RDB program which was included on the System Programmer's Guide disk. But for fitting it into a 1K byte ROM, the Front Panel did a lot.
You could use the SPJ technique to cold- or warm-start your machine if it happened to fall into Front Panel mode. SPJ400 space G would cold-start, and SPJ403 space G would warm-start the 8813. This made use of ROM vectors stored at 400 and 403, which would then jump to the appropriate places to restart the system.
One more trick
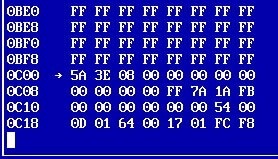 Here's one more thing you can easily try in the Front Panel. Examine memory location C00 by typing this command: Here's one more thing you can easily try in the Front Panel. Examine memory location C00 by typing this command:
LC00 space
Notice the four bytes to the right of the 0C00 and arrow. These data bytes are the real-time clock (RTC) data area. They are incremented (added to) automatically, each time a 60 Hz interrupt occurs. You can watch this happen.
Press Z. (Not Control-Z this time.) This is a non-command; it doesn't do anything except refresh the display to show current values. Each time you press Z, you should see a new value pointed to by the arrow. If you were good at hexadecimal math and could press Z exactly once per second, you'd notice that the four-byte value changes by about 60 (3C hex) each second.
To learn more
For a complete discussion of the Poly Front Panel mode, please see the Poly-88 Operation Manual, especially the section on the Front Panel which begins on page 59 (page 61/146 of the PDF file).
|