System 8813 Emulation
This page describes the details of running the Poly Emulator in its default, 8813 mode. If you have not already seen it, you should start with the main Emulator page.
To emulate the System 8813, you will need these files:
pm.exe
polydev.dat
and one or more of the vdisk (virtual disk) files, *.pm. All of these are available on the main Emulator page.
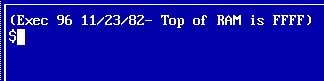
To start the emulator in 8813 mode, just type its name, PM, at the C:\PM> prompt. After a few moments, the Poly operating system will start up, and report
If you've never used a Poly (or forgotten), here are a couple of commands you can try. Most Poly commands are case-sensitive, and nearly all of them must be entered in uppercase.
L or l (lower case L) - lists files in the current drive. You can also type L 2 to list the files on drive 2, etc. With the arrangement of files provided with PM, you'll see some demo programs on drive 2.
EN - enters "enabled" mode, from which you can press Control-Z to enter the Front Panel. Type DISA (disable) to return to the safer mode.
BASIC - runs the BASIC language interpreter. From BASIC, you can use the BYE command to return to Exec.
And before I forget: the "interrupt" character, which would stop most programs, is Control-Y.
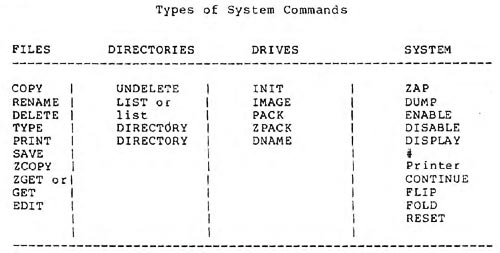
Here's a chart showing some of the available Exec commands. It was a fairly complete operating system, with all the usual utilities such as RENAME and DELETE.
Games!
As shipped, PM includes a set of games on drive 2. Type the command L 2 to see the files on drive 2. (When you see the dot at the bottom of the screen, press any key to continue the listing.)
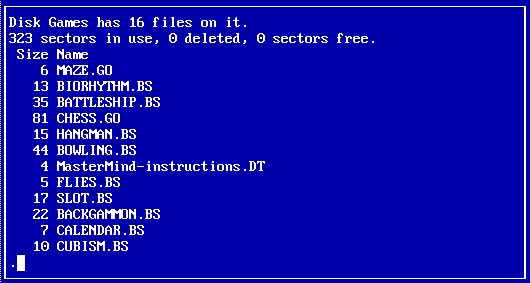
To execute a file on drive 2, you need to specify the drive number in angle-brackets. For example:
<2<BATTLESHIP
Be sure to type the name in upper/lower case, exactly as you see it in the directory. (Poly commands and file names are case-sensitive.) Since BATTLESHIP is a .BS (BASIC) file, the system will automatically load the BASIC interpreter first, then load BATTLESHIP. A file with a .GO extension is machine code, and will immediately load and run.
For lots more about running Poly commands, editing files, building programs with BASIC and 8080 assembly language, please see the documentation available here.
The vdisks
Above, we talked about "drives" 1, 2, and so forth. What drives? When you downloaded PM, you received several files with a .pm extension. I call these virtual disks, or vdisks. When running PM, you can access drives 1 through 7, just like a normal 8813. But each of the "drives" you are accessing is actually a virtual disk. A vdisk is just a file, in DOS or Windows, but that file happens to contain all the sectors of a Poly disk. To the Poly, it's a drive; to the PC, it's a file.
How does PM know what vdisk (PC file) corresponds to which drive? We use a configuration file called POLYDEV.DAT, which contains lines like
drive 1 system.pm
drive 2 games.pm
This establishes a connection between <1< and the vdisk called SYSTEM.PM, and between <2< and GAMES.PM.
PM reads this POLYDEV.DAT file when it starts. You can edit this file with any text editor to change your defaults. You can also use the PMU program, described later, to change these connections "on the fly," just as you could with Poly's Volume Manager.
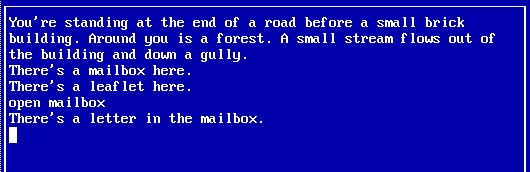
Booting a different vdisk. If you just want to boot from a different vdisk without editing the POLYDEV.DAT file, you can specify that vdisk's name on the command line. Try starting PM with this DOS command:
pm advent.pm
The vdisk named advent.pm contains a bootable system and a version of the old mainframe game, Adventure. It accepts plain English commands like "open mailbox." Try it!
The PMU Program
PMU is the "PM Utility" program. It handles things which involve the PM environment, or interactions between the PC and the emulator program. To run PMU, just type its name at the Exec prompt:
$PMU
pmu:
When you see the "pmu:" prompt, type in any of the PMU commands described below. If you don't have this document handy, type HELP to get a brief list. Commands may be entered in upper or lower case.
The SHOW command lists the current PM vdisk assignments. Example:
pmu: SHOW
Current drive assignments:
1: system.pm
2: games.pm
3:
4:
5:
6:
7:
The CONNECT command changes a drive assignment. Type the CONNECT command, followed by the Poly drive number, then the PC filename for the vdisk. For example:
pmu: CONNECT 3 STUFF.PM
would assign Poly drive <3 to the PC file STUFF.PM, which should be a Poly vdisk. If it isn't, you'll get the message "disk directory destroyed!" when you try to access it. Poly used a checksum to ensure that disk directories weren't corrupted.
This is a good time to explain that you can enter everything to PMU as a single Exec command, without having to go into PMU, enter a command, then quit. For example, you could type PMU C 3 STUFF.PM when you see the Exec (dollar sign) prompt. And this illustrates that commands can be abbreviated - C for CONNECT, etc.
The SIZE command changes the size of a Poly vdisk. (Try that, Exec!) You can increase the size until it uses all available disk space (or 65535 sectors at most). You can also shrink a vdisk until it only has room for the files currently stored on it (and therefore has 0 sectors free). Example:
pmu: SIZE 3 500
If you request a disk size that's smaller than the number of sectors in use, PMU will complain. If you request a size that's larger than the amount of free space available on your PC disk, PMU will increase the size as much as it can, using all that available space, then will tell you what the size was actually set to.
The COPY command moves files between the Poly and PC file systems. You must specify the source and destination filenames. For example,
pmu: COPY <1<POLYFILE.TX C:PCFILE.TXT
would copy the Poly file <1<POLYFILE.TX to PC file C:PCFILE.TXT. You can copy in either direction, from Poly to PC or vice-versa. You must include a path specifier on either the Poly filename (like <1<), on the PC filename (like C:), or both. Otherwise, PMU can't tell which is which, and will complain. For best results, don't put \ or : in your Poly filenames, since it will make them look like PC filenames. PMU will then ask,
Text or Binary treatment (T or B) :
Press T or B, and then Return. If you select text treatment, the file is copied with the proper end-of-line characters (CR alone on the Poly; CR/LF on the PC) and the NUL bytes at the end of the Poly file are stripped out. If you select binary treatment, all bytes are transferred. Remember that Poly filenames are case-sensitive (upper and lower case are considered different), but PC filenames are not.
The PRINTER command allows you to re-direct where PM's printer output goes. (Note - serial and parallel port printer output may not work when running PM in Windows.) You can specify a PC parallel printer port, with a command like
pmu: PRINTER LPT2
which would begin sending printer output to device LPT2. You can also specify a PC serial port (COM port), with
pmu: PRINTER COM1
Or, you can give an PC filename, such as
pmu: PRINTER OUTPUT.TXT
which would create a new PC file, called OUTPUT.TXT, and begin sending PM printer output to it. Be sure to limit your filenames to the old DOS 8.3 naming format: 8 characters maximum, with a 3-character extension. The file remains open, and output continues to go into it, until you use PMU to send output elsewhere, or until you leave the emulator. Note: Poly software sometimes sends NULs (the character with hex value 00) to the printer device. Most printers will ignore that character, but PM will obediently send it to a PC file if you have redirected your printer output. Watch out for that character in any files you've created with printer redirection. (The PM printer handler does not eliminate NULs, since some programs may deliberately be sending them to the printer, perhaps to perform some graphics functions.)
If you're using a serial printer, you must set your serial port's baud rate to agree with your printer. You can do this with DOS's MODE command, and you should do it before running PM.
For example, to set the COM1 port to 9600 baud, 8 bits, no parity, one stop bit:
C:\PM>mode com1:9600,n,8,1
When using a serial printer, PM's printer driver supports the "input from printer" function. Some programs may be able to use this to read from the serial port. However, most Poly programs that do input from the serial port try to access the USART hardware directly, and PM doesn't emulate this hardware, so they won't work. Poly's FTP program doesn't work in PM.
The DOS command suspends operation of PM and takes you to a "DOS shell." Use this to perform a few simple DOS commands, look around at files, etc. But don't plan to stay here for long; PM is still loaded in memory and may interfere with any large programs you run while in the DOS shell. If you plan to do much with DOS, exit PM with ALT-F1 and Q. When you're done with the DOS shell, type EXIT to return to PM.
The QUIT command exits PMU and returns you to Exec.
|
